# Real-Time Lighting & Reflections
Wallpaper Engine supports real-time lighting and reflections on 2D scenes. This requires you to enable either the Lighting or Reflection options in the material settings of an image layer. These two functionalities work well together but, as always, try to not enable both of them if you do not really need them to keep the performance impact as low as possible.
# Generating a Normal Map
In order for 2D images to get a perception of depth that is used for lighting and reflections, we need to make use of a normal map. Normal mapping is a common approach in video games to give flat textures a perception of being three-dimensional. Wallpaper Engine comes with a normal map generator that you can use to easily generate a normal map for your image layers.
In order to get started, select your image layer that you want to apply real-time lighting and / or reflections onto. This works best if your specific character or object is its own layer, we highly recommend using foreground separation to first separate any character or object from the background before you continue, if you have not done so already.
After selecting the layer that you want to create the normal map for, scroll down on the right-hand side and click on the Configure Lighting & Reflections in the Materials section towards the bottom. Now, enable the Lighting or Reflection option (or both) to reveal additional options, including the normal map generator.
Click on the Generate button in the Normal map section to open up the normal map generator. You can now tweak the normal map to match your specific object better, though the default options should already work well for most cases. You can find a detailed description of all the options below.
# Shape
- Blur: Blurs the overall shape of the normal map, we generally recommend to leave this on a higher blur in most to avoid jagged edges.
- Depth: Controls the perceived strength of the 3D effect on the outer edges of an object. In most cases, you can leave this at its maximum value.
- Exponent: The exponent controls how pointed the surface area of an object appears. For something like a body, a higher exponent makes sense as it will appear more round. For something like an inanimate pyramid-shaped object, an exponent of 1 makes the most sense. For most cases, the default value is a good solution.
- Threshold: Controls how far the shape reaches into the center of the object, for most cases you can leave this at its maximum value but you can reduce the threshold to make the outer areas of shape more pronounced as they will be more abrupt.
# Details
- Blur: Blurs the surface details of an object. Generally you want to keep this at a lower value to retain the surface structure but often it makes sense to apply a little bit of blurring to make details appear less jagged.
- Depth: Controls the strength of the surface details of an object, setting it to 0 will cause all surface details to disappear. For most cases, it can be left at its maximum value.
- Invert: Inverts the direction of details of an object to flip what is in the perceived foreground and background of an object.
Watch the video below to see all the steps up until this point:
# Lighting
After enabling the Lighting option for your layer, you will have noticed that it immediately turned dark. This is because your scene, by default, is lacking any significant light source. You will need add the appropriate light sources to your scene and adjust them accordingly. To do this, click on Edit at the top of the browser and then Add Light. You can move the light sources around just like any other object in the editor.
TIP
Keep in mind that light sources will only have an effect on image layers with the Lighting option enabled, as we have done in the previous section.
For now, we simply add two light sources to our scene and use the color picker to select colors directly from our wallpaper so that the light color matches the contents of the image. You can see this process in the following video:
Keep in mind that Wallpaper Engine limits the maximum number of lights per scene to four light sources for performance reasons. You should use individual light sources only as needed. Instead of lighting your scene with many individual lights, you should adjust the ambient lighting of your scene, see the next section for more information.
# Adjusting Ambient Lighting
You will also need to take ambient lighting into account that Wallpaper Engine adds to your scene. This ambient lighting that Wallpaper Engine adds to your scene can be configured in the Scene options on the left-hand side. Open the scene options and adjust the ambient illumination to your needs, we change the Ambient Color to a slightly whiter tone to make it a little brighter but you can choose any color you want here to give your whole scene a certain type of glow.
Another important thing to consider: By default, Wallpaper Engine will have a gray background color behind and around your scene. Under normal circumstances, this does not matter, but with reflectivity and lighting enabled, the background color can influence the lighting of your scene in the editor and when users choose a wallpaper alignment option where the background color becomes visible.
Be sure to always adjust the Background Color option in the Scene options to match your image or to set it to black (color code #000000) when working with light and reflections.
You can see these two steps in the following video:
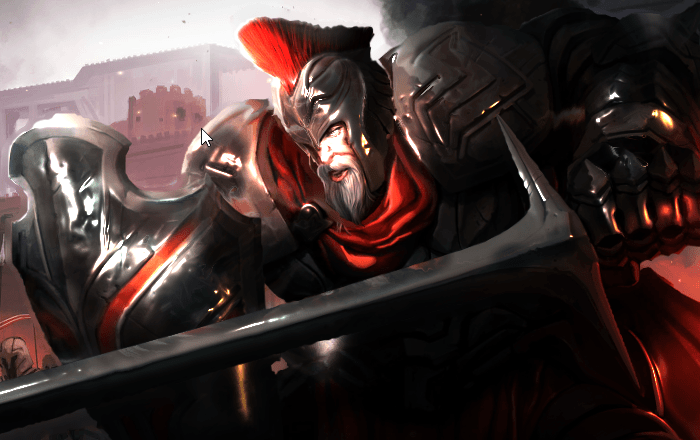
# Surface Materials
Now that we have added lighting to our scene, it becomes noticeable that the light is reflected excessively in some places, for example on the face of our sample character:
This can be addressed by adding a Metallic map to the image layer of our character, just below the Normal map that we added in the beginning of this tutorial. Simply press the Paint button in the Metallic map section that we have seen before.
The Metallic map allows us to paint which areas are shiny like metal and which areas are not. Since our example character is wearing a shiny armor, we start by painting the whole mask with a value of around 120 - 150 to give it an overall shine. We then continue by painting the face and all cloth areas of our character with a value of 0. This removes any metallic look from these particular areas.
We then move on and paint areas that we want to highlight with a very high value of 255, such as the sword and shield of our character. These elements will now appear very shiny and metallic while the face now will be much less reflective.
Please note: If you leave the metallic map empty, you will also find an additional Metallic slider below the list of maps. If your character or object is very metallic or not metallic at all, you can also just adjust this slider value accordingly instead of taking the time to paint the complete map.
# Roughness Map
After having added the metallic map in the previous step, the result is already pretty good. We can further improve the look of the surfaces by also creating a Roughness map. The roughness map affects the scattering of the reflected light, essentially it defines how blurry the reflection is. You can use lower values in the range of 10 - 50 for metallic surfaces, something less reflective such as cloth and skin can be set to values from 200 and up. For the roughness map, we do not recommend using very low values around 0 or very high values around 255 as these tend to not look very realistic, though they might be useful in more abstract concepts.
In our case, the roughness map looks rather similar to the metallic map but it lets us further emphasize certain parts of the image by tweaking the reflection further. We started by painting the entire mask with a value of around 70 followed by values around 200 for the skin and cloth elements and values from around 10 - 50 for areas where we wanted to add a strong shine to the image, such as the helmet of our character and the sword. See the following video of the mask we have drawn for our character as we show you the mask overlayed to the image layer, followed by the end result.
Please note: If you leave the roughness map empty, you will also find an additional Roughness slider below the list of maps. You can also just adjust this slider value accordingly instead of taking the time to paint the complete map.
# Reflection Map for Final Tweaks
Additionally to the previous maps, you can also add a Reflection map. A reflection map is often really not necessary and you can leave it out altogether but it can be helpful in certain edge cases to tweak individual parts of the reflections. You can also reduce the overall reflections by lowering the Reflectivity slider below the list of masks.
In our example, we noticed a slight glow at the top of the helmet decorations. We add a Reflection map, and as a very first step, we paint the whole map in white (at a value of 255) to ensure the reflections we have created previously stay as they are. We then set the value to 0 and paint the helmet decorations in black and save the reflection map. Looking at the helmet decorations now, the minor glow that was previously present has now disappeared entirely.
# Next Steps
If you have created a normal map and painted the other material maps as needed, the lighting on your wallpaper should already look pretty good. However, at this point, all the light in the scene is static, be sure to check out our guide on advanced lighting tips to learn about different ways you can make the lighting a bit more complex and interactive: