# 3D Model Shaders
Wallpaper Engine comes with a handful of pre-created shaders that can be applied to individual materials of models.
# Fur Shader
The fur shader allows you to selectively add volumetric hair to your model's texture.
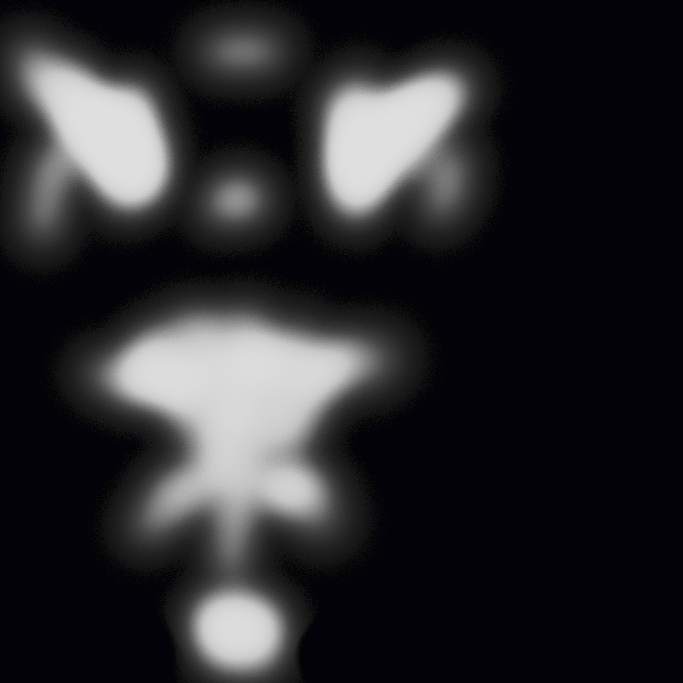
Before getting started in Wallpaper Engine, make sure that the texture of your model comes with an alpha channel which represents where the fur is supposed to be rendered. This is important as you typically do not want the fur shader to appear in all spots at the same time or with the same intensity. Take a look at the following implementation for the model shown in the preview above. The alpha channel is shown separately here, but this would be imported as a single file:
Keep in mind that not all image editors allow you to draw the alpha channel independently and your image might seem broken in certain image viewers, rest assured Wallpaper Engine will interpret the image file correctly. If you are having issues, try exporting your image as a .tga file from your image editor.
To get started with the fur shader in Wallpaper Engine, select your model and click on the button for the material that you want to apply it to. Set the shader to Fur at the top, then look for the Blending option at the bottom of the material options and set it to Alpha to coverage.
You can now define the fur rendering quality at the top of the material options. If your model is only ever viewed from far away, there is no need to increase this option. Try to find the correct balance between actual visible improvements and the performance impact the increased quality incurs.
Additionally, you can change the following settings:
- Detail: Higher values result in finer hair.
- Distance: The length of the hair.
- Occlusion: The amount of shadow the hair casts on the model.
# Vegetation Shader
The vegetation shader can be used to animate trees and bushes, though you may be able to utilize it for other materials that swivel in the gusts of wind. In this section, we will showcase how to apply the vegetation shader on a tree model and how to fine-tune it to get a good result.
To get started, import your tree model and ensure that the tree bark and the tree leaves are using different materials, since the rigid part of the tree should not be affected by this shader. As a first step, click on the material that represents the leaves of the tree and scroll all the way to the bottom of the properties list. Look for the Blending option and set it to Alpha to coverage. This will ensure the transparent parts between the tree leaves will be properly rendered.
If the geometry of the leaves on your model is single sided, which is the recommended way to model vegetation, you also need to change the Culling option to No cull. If your model has visible polygons from both sides, you do not need to do this, but this may result in shadows looking poor.
Next, you may want to enable the Double-sided lighting option if you are using lighting. This will ensure that light will shine through the individual tree leaves, causing them to be visibly brighten from both sides even if light is coming from the opposite side.
Depending on your texture, you may need to configure the Leaves UV direction and the corresponding Leaves UV mapping option if the texture has a different UV mapping that you need to account for. The UV direction changes the magnitude of the animation based on the direction of the texture, you want the highest magnitude for the tip of the leaves. The UV mapping parameters allow you to use images that don't cover the entire available space on the texture.
At this point, you should have a basic tree with visible leaves. The vegetation shader comes with various settings, some of which you need to adjust to fit your model. See the Debug Mode section below for further information.
You usually want to use the same values for both the trunk and the leaves material, ensuring their animations are in sync. Simply make sure to set the Strength leaves option to 0 on the trunk material and disable the Double-sided lighting on the tree trunk.
- Crunch: Allows you to fine-tune the distortion of the leaves moving in the wind.
- Tree height: Configures the height of the tree, should be done in debug mode (read below).
- Phase: Configures a time offset for the animation. If you have multiple trees, you can make them animate out of sync by setting different values here.
- Tree radius: Sets the radius of the tree, should be done in debug mode (read below).
- Scale: Sets a reference size of the tree to define its overall size for the animation. Should be done in debug mode (read below).
- Speed base: Sets the speed of the animation towards the center of the model.
- Speed leaves: Sets the speed of the animation at the outer end of the model.
- Direction: Configures the direction of the simulated wind.
- Strength base: Sets the force of the animation towards the center of the model.
- Strength leaves: Sets the strength of the animation towards the outer end of the model.
# Debug Mode
Some of the options of this shader are hard to fine-tune without some additional visual aids. To help with this process, the shader has a debug mode which you can enable at the top of the shader settings. In the following example, we set the Animation debug to Debug size which allows us to debug the height and radius at the same time.
What we want to achieve is to evenly distribute the colors representing the height of the model and the radius of the model by adjusting the Tree height and Tree radius option until they appear as a smooth gradient across the model in debug mode. After configuring these settings, make sure to switch the debug setting back to None.
# Chroma Shader
The chroma shader can be used to add a metallic and colored reflection to the texture of a model.
The setup of the shader is fairly simple. Open the metallic material of your model and set the Shader at the top to Chroma.
You can now configure various visuals aspects of the shader:
- Metallic: Changes the level of reflections, increased values appear more metallic.
- Roughness: At a roughness of
1.0, the specular highlight covers the entire surface. Towards0.0, the shine of the tint increases. - Specular tint: The color of the ambient light which is reflected on the object.
- Tint back: The color which appears on the model further away from the camera perspective.
- Tint front: The color which appears on the model closer to the camera perspective.
- Pigmentation: Adds a level of graininess to the effect.
- Exponent: The distribution of the color gradient, higher values will give preference to the Tint back color.
Advanced: Enable the Tint mask in albedo alpha option to exclude certain parts of the texture from the color tint of this shader. In our example, we have done this with the white stripes of the car. In order to do this, you need an image editor like Photoshop which can draw the alpha channel independently. Areas which are marked with 0 transparency in the alpha channel are not colored by the shader.