# User Properties
Wallpaper Engine allows you to make parts of your wallpaper configurable by your users by adding so called user properties to your project. These user properties appear on the right-hand side when a user selects your wallpaper in the Wallpaper Engine Installed tab. In this guide, we will explain how to create properties, what each property type represents and how to access them through JavaScript.
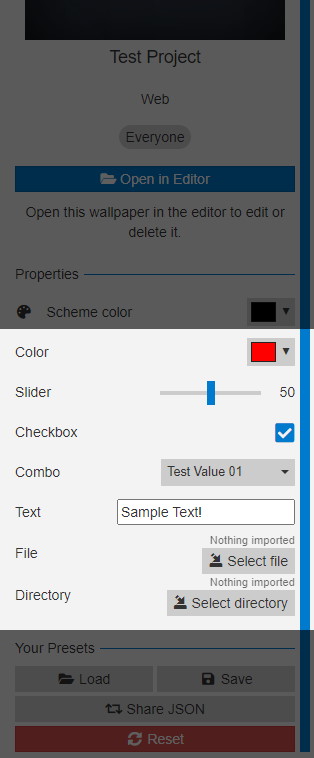
The following screenshot shows what it looks like when you add each property type to your wallpaper once:
# Creating User Properties
You can create new properties by opening your web project in the Wallpaper Engine editor, navigating to the Edit menu at the top and selecting Change Project settings. You can then create a new property by clicking on the Add Property button. The following user property types are available for creation:
- Color (
color): A color picker - Slider (
slider): A slider that allows users to select a number within a specified range - Checkbox (
bool): A checkbox that is either off or on - Combo (
combo): A dropdown selector where each element has a text and a hidden value - Text (
textinput): A text input field - File (
file): A file selector to import an image or a video - Directory (
directory): A directory selector to mass import image or video files
# Reading property values
You can utilize the wallpaperPropertyListener and its applyUserProperties which is triggered whenever a user changes a property that you have added to your wallpaper or when the wallpaper is first loaded. The event only contains properties that have changed their value, so it's important to always check if a property is included like in the example below (yourproperty and anotherproperty should be replaced with the actual key of your properties).
window.wallpaperPropertyListener = {
    applyUserProperties: function(properties) {
        if (properties.yourproperty) {
            // Do something with yourproperty
        }
        if (properties.anotherproperty) {
            // Do something with anotherproperty
        }
        // Add more properties here
    },
};
The event will also fire once when the wallpaper is loaded containing all user properties. It is important that you assign one if condition per user property as shown in the example above to ensure that the event works properly when a wallpaper is loaded and when a single property value is changed by the user.
Important
Always make sure to initialize window.wallpaperPropertyListener as a global object outside of any events, otherwise it might miss some important property update events when the wallpaper is loaded.
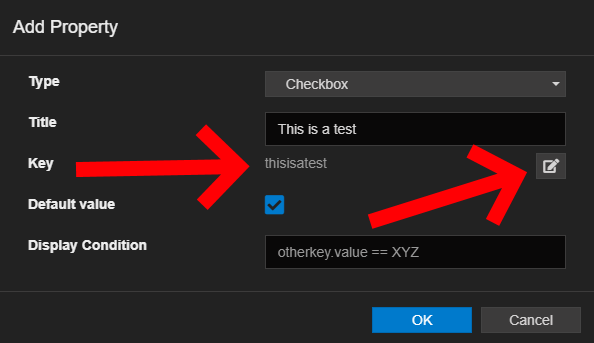
The key used to access the properties is automatically generated when you create a property. You can use the edit button on the right-hand side of the element to edit it before the property has been created. The key cannot contain any special characters and only allows for English and numeric characters.
Especially if you give your property a foreign title or use special characters, you should set a custom key that makes it easy to understand what the property key represents:
# Property Overview
# Color property
Color properties let users pick a color that you can use on HTML elements as part of CSS rules or canvas drawings, for example. You can configure a default color that is used but other than that, the color picker is simple to configure.
The color property will return three numeric values, separated by a space character (1.0 0.1 0.25 for example). In order to utilize these values as part of CSS rules, you need to first convert them to the usual 0 to 255 value range which can be done by first using the split and then map function as shown in the example below.
window.wallpaperPropertyListener = {
    applyUserProperties: function(properties) {
        if (properties.customcolor) {
            // Convert the custom color to 0 - 255 range for CSS usage
            var customColor = properties.customcolor.value.split(' ');
            customColor = customColor.map(function(c) {
                return Math.ceil(c * 255);
            });
            var customColorAsCSS = 'rgb(' + customColor + ')';
            // Do something useful with the value here or assign it to a global variable
        }
    },
};
Be sure to replace properties.customcolor with the actual key of your color property.
# Slider property
The slider property type is a good way to let users tweak a numeric variable in a predefined range. You are required to configure a default value, a minimum value and a maximum value to constrain the default state and the range of the slider. Additionally, you may enable the Fraction option which will allow users to pick fractional numbers. If the Fraction option is enabled, a Precision option will appear which allows you to further specify the number of decimal points that you want to make available to users. By default, precision is set to 2 which means users can choose numbers on a 0.1 step basis.
The value can be directly read from the property in the following manner:
window.wallpaperPropertyListener = {
    applyUserProperties: function(properties) {
        if (properties.customslider) {
            var mySliderValue = properties.customslider.value;
            // Do something useful with the value here or assign it to a global variable
        }
    },
};
Be sure to replace properties.customslider with the actual key of your slider property.
# Checkbox property
The checkbox property type is a simple boolean on / off switch and will either be true or false. You can set a default state when setting up the checkbox property.
The selected value can be directly read from the property in the following manner:
window.wallpaperPropertyListener = {
    applyUserProperties: function(properties) {
        if (properties.customcheckbox) {
            var mySliderValue = properties.customcheckbox.value;
            // Do something useful with the value here or assign it to a global variable
        }
    },
};
Be sure to replace properties.customcheckbox with the actual key of your checkbox property.
# Combo property
The combo property shows a dropdown selection list to the user that consists of a text label and a hidden value, both of which you need to configure when setting up this property type.
The value for the selected option can be directly read by accessing the value property of the object:
window.wallpaperPropertyListener = {
    applyUserProperties: function(properties) {
        if (properties.customcombo) {
            var mySliderValue = properties.customcombo.value;
            // Do something useful with the value here or assign it to a global variable
        }
    },
};
Additionally, you can also access the label itself through .text though generally you should stick to only handling the value.
Be sure to replace properties.customcombo with the actual key of your combo property.
# Text property
The text property type is a user-configurable string. You can set a default string when setting up the property in the editor.
The selected value can be directly read from the property in the following manner:
window.wallpaperPropertyListener = {
    applyUserProperties: function(properties) {
        if (properties.customtext) {
            var mySliderValue = properties.customtext.value;
            // Do something useful with the value here or assign it to a global variable
        }
    },
};
Be sure to replace properties.customtext with the actual key of your text property.
# File property
The file property type allows you to add an option for users to load an optional image or video which you can then incorporate into your wallpaper using. Your wallpaper should be functional without this image, so it's best if you create some sort of fallback case (using a default image / video or a solid color for example).
The file property has a file type option which lets you define if you want users to load an image file (.jpeg, .jpg, .png, .pnga, .bmp, .gif, .svg, .webp) or a video file (.webm, .ogg, .ogv).
One thing to keep in mind is that you need to prepend the file location that the value object returns with file:/// so that it becomes readable by the Wallpaper Engine web browser. In the following example, the file location of an image is read and assigned to an image element:
window.wallpaperPropertyListener = {
    applyUserProperties: function(properties) {
        if (properties.customimage) {
            // Read the file
            var customImageFile = 'file:///' + properties.customimage.value;
            // Assign the file to the src attribute of an image element
            imageElement = document.getElementById('SomeImageElement');
            imageElement.src = customImageFile;
        }
    },
};
You can also assign the value to a CSS background image using url(''), in that case make sure to not forget the apostrophes inside:
canvas.style.backgroundImage = "url('file:///" + properties.customimage.value + "')";
Be sure to replace properties.customimage with the actual key of your file property.
# Directory property
The directory property is useful if you want to allow users to mass import images or video files. This may be useful if you want to build a slideshow or another type of wallpaper that relies on a great number of image or video files.
The directory property has two modes of operation that you can choose between when setting up the property: The ondemand mode and the fetchall mode.
The directory property has a file type option which lets you define if you want to load image files (.jpeg, .jpg, .png, .pnga, .bmp, .gif, .svg, .webp) or video files (.webm, .ogg, .ogv) from a directory.
# "ondemand" directory
A directory property configured to be in ondemand mode will allow users to pick a directory from which you can load images whenever your wallpaper needs a new image. For this purpose, you can use the predefined window.wallpaperRequestRandomFileForProperty function that Wallpaper Engine provides. This function has two parameters, where the first parameter must be the exact key of your directory property (in our example below, that would be customrandomdirectory) and the second parameter is a function callback which does something with the image file path that is returned to it.
In order to cycle through images, simply call this function on a timer, for example. You can also call it multiple times to get more than one image for use.
function randomImageResponse(propertyName, filePath) {
    imageElement = document.getElementById('UserImage');
    imageElement.src = 'file:///' + filePath;
}
window.wallpaperRequestRandomFileForProperty('customrandomdirectory', randomImageResponse);
Additionally, you should also listen to changes to the property itself just like with other properties. You should react to changes to the directory and handle a case where a user removes the selected directory altogether:
window.wallpaperPropertyListener = {
    applyUserProperties: function(properties) {
        if (properties.customrandomdirectory) {
            if (properties.customrandomdirectory.value) {
                // Directory set
            } else {
                // No directory set
            }
        }
    },
}
# "fetchall" directory
A directory property configured to be in fetchall mode allows you to get a large number of file paths which you can then handle as you wish, though you should make sure that your wallpaper does not load an infinite number of images or video files just because the user selects a large directory. All file paths must be prepended with file:/// in order for you to access them.
Unlike other properties, directory properties set to fetchall mode require you to use the userDirectoryFilesAddedOrChanged and userDirectoryFilesRemoved events in the wallpaperPropertyListener instead of applyUserProperties. These two event callbacks allow you to track all files that were added (or modified) and removed from the user selection.
window.wallpaperPropertyListener = {
    userDirectoryFilesAddedOrChanged: function(propertyName, changedFiles) {
        // propertyName is the name of the property that triggered the event.
        // changedFiles contains all added (or modified) file paths
    },
    userDirectoryFilesRemoved: function(propertyName, removedFiles) {
        // propertyName is the name of the property that triggered the event.
        // removedFiles contains all removed file paths
    }
};