# Mouse Cursor Click Events with SceneScript
SceneScript comes with a set of events related to the mouse cursor which lets you react to mouse movement and mouse clicks. Be sure to view the reference page for cursor events to get a quick overview:
On this page, we will show some use-cases that you can utilize or build upon for your own wallpapers.
# Mouse Cursor Click to Play a Sound
In order to play a sound by clicking on a wallpaper element, you will first need to import a sound file into the editor. After importing your sound file, select it and change the following things:
- Give the layer a concise and unique name, you will later need this in your SceneScript code. By default, Wallpaper Engine uses the file name of your audio file.
- Set the Mode option to Single so that your sound only plays once.
- Enable the Start silent option at the bottom, otherwise your sound will play once when the wallpaper is loaded.
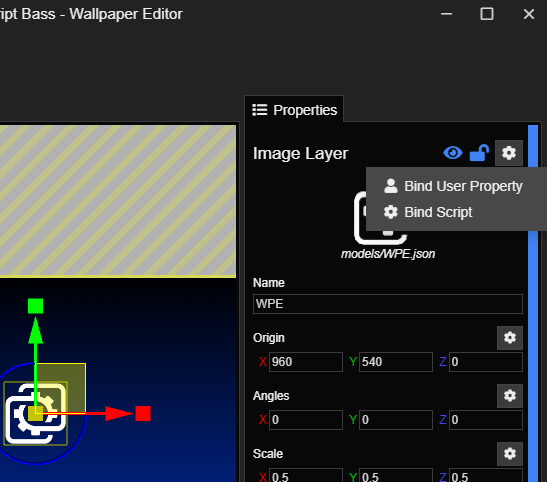
Once you have prepared the sound layer, select the layer that you want to click on to play your sound file. For general events like this, there is no dedicated place to define them in Wallpaper Engine. By convention, you should place cursor click events next to the Visibility property in the upper right corner when selecting a layer. To do this, click on the cogwheel icon next to the eye icon in the upper right corner of your layer, then select Bind Script:
You will be presented with an empty update() function, you can delete the function as it is not needed for the click event. In order to react to mouse clicks, we will need the cursorClick event function. Wallpaper Engine will automatically execute this function when a user clicks on an object in Wallpaper Engine. In the event function, we now have to retrieve the sound layer that we have created previously using thisScene.getLayer() and execute the play() function on it to play the sound.
Take the following code snippet as an example, you will simply have to replace PLACEHOLDER with the actual name of your sound layer and you are already done. Confirm your code by clicking OK to close the SceneScript editor, then click on Run Preview at the top of the editor and click on your element to test if your event works.
'use strict';
const SOUND_LAYER_NAME = 'PLACEHOLDER';
/**
 * @param {CursorEvent} event
 */
export function cursorClick(event) {
	thisScene.getLayer(SOUND_LAYER_NAME).play();
}
TIP
You don't need to copy-paste this example into the editor, you can quickly access this code snippet in the editor by clicking on Snippets, followed by Replace Script where you will find Click Play Sound in the list of available snippets.
# Mouse Cursor Click to Run a Timeline Animation
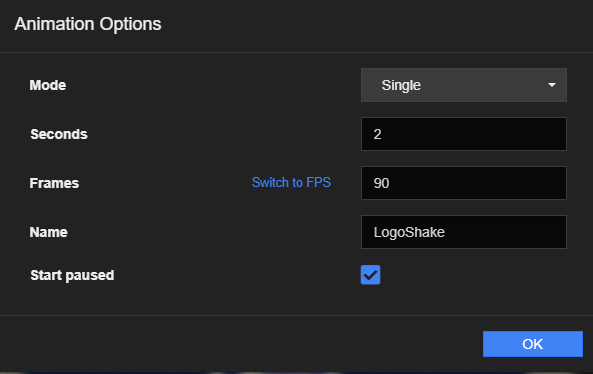
In a similar fashion to the previous tutorial, you can also apply this approach to timeline animations for example. We generated a timeline animation on the Scale property of an image layer. During the setup of the timeline animation, it was important that was set the Mode to Single so that our animation only plays once and to specifically give our timeline animation a name. In our case, we called it LogoShake:
We now repeat the same steps as we did in the previous section by creating a cursorClick() function on the visibility property of our object. However, in this example, we will retrieve and work with our timeline animation instead of a separate sound layer.
To do this, we first call thisLayer.getAnimation(). Here, it's important that we have filled in a unique name for our timeline animation as explained above so that we can place its name in the getAnimation() function parameter. Lastly, we can call the play() function on the animation which will play the animation on click. See the full example below, just make sure to replace LogoShake with the name of your timeline animation.
'use strict';
/**
 * @param {CursorEvent} event
 */
export function cursorClick(event) {
	thisLayer.getAnimation("LogoShake").play();
}
Now, when we click on our object, our timeline animation will be played once as shown in the following video:
TIP
In principle, what we explained on this page works for all wallpaper editor elements that contain a type of play() functionality:
- IAnimation - Timeline Property Animations
- IAnimationLayer - Puppet Warp Animations
- IParticleSystem - Particle Systems
- ISoundLayer - Sound Files
- ITextureAnimation - Texture Animations
- IVideoTexture - MP4-based Video Textures
First prepare a relevant object, then retrieve it from the wallpaper, then call the play() function on it.