# Attachment Points
You can define attachment points for your puppet model which you can use to easily attach other editor assets to specific parts of your model. In this guide, we will showcase two different ways to utilize attachments.
# Hierarchy Attachment: Attaching Particle System to Puppet
If you simply want to attach a single object to a specific point of your puppet model, this is the most straight-forward approach to achieve this. In our example, we will attach a particle system to the sword of our sample character but this could really be any other editor asset.
First, select your existing puppet warp model. In the puppet overview, scroll down to the Optional section and click on the Attachments button. Wallpaper Engine will now present all the bones of your puppet model.
To create an attachment, select one bone and then click anywhere on the exact part of the model that you want to place the attachment point. A new attachment point is created automatically. We strongly recommend that you give your attachment points a clear name so that you can easily recognize them in the next steps. After having named your attachment point, click on the Confirm button to save the attachment setup.
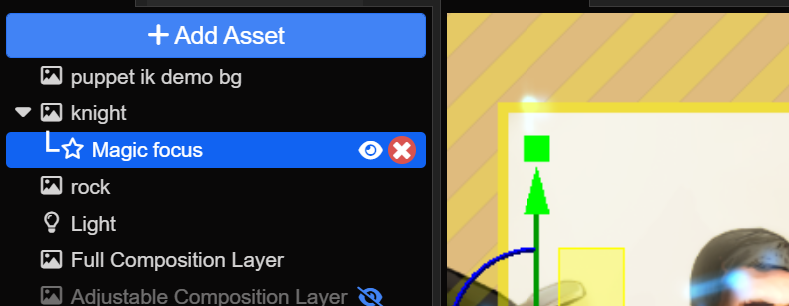
Next, select any layer that you want to attach to your model. In our example, we want to attach one of the default particle systems to the sword of our puppet model. First, move the layer in the asset list on the left onto your puppet layer and swerve to the right to make it a child element of your puppet layer:

Once you have created this hierarchy, right-click on the attached element and hover over the Hierarchy menu item. Select Set Parent Attachment and choose the attachment from the list that is shown. In our example, we have created the attachment point on the sword of our character and named it "Sword Start". The particle system immediately jumps to the attachment point and will follow it along all animations.
Watch the entire process as a video here:
# Binding Point Properties to Attachments
Some assets and effects allow you to bind specific points to puppet warp attachments. We will showcase this with the Advanced Fluid Simulation effect.
First, we create two attachment points along the sword that we have also used in our previous example (see the previous section for a more detailed step-by-step guide on how to create attachment points). We give them clearly identifiable names: Sword Start and Sword End.
Next, we create an Adjustable Composition Layer. This is only relevant for image effects and can be skipped for other assets, like particles. The Adjustable Composition Layer needs to span the area that the animation will be visible in, in our case we'll create an 850x850 pixel square and place it roughly in the area that the sword is visible in.
We now select the Adjustable Composition Layer and add the Advanced Fluid Simulation effect to it. We want to showcase the Line emitter functionality here, so we first set the Line emitter count to 1 and change the Point emitter count to 0. We now scroll down to the settings of the line emitter. You will find their two points there: p0 and p1 which are the start and end point of the line emitter.
Click on cogwheel icon next to the first point p0 and select Bind to Attachment. We select the Sword Start attachment that we have created previously and confirm our selection. Next, we repeat the same for p1 but here we select the Sword End attachment instead. To verify these changes, click on the Run Preview button, as these bindings are only active when the wallpaper is actually running. In our preview, we can now see a line of fire across the entire sword that follows the animation.
Watch the entire process in the following video:
