# Clipping Masks
Clipping masks are a useful tool to restrict the visibility of certain parts of a puppet warp model until it moves over predefined areas. This can be used to implement some unique effects and is especially useful for creating the appearance of animated shadows or shading on an object.
If you want to achieve this type of self-shadowing effect, your image ideally does not include shadows itself. Rather, you would create the shadows with separate elements and overlay them in Wallpaper Engine at runtime.
# Basic Principle of Clipping Masks
Clipping masks can be used in combination with puppet warp character sheets. To get started with a clipping mask, create a puppet warp image layer. Make sure to lock the geometry in the Geometry settings of the puppet warp setup. Afterwards, set up the skeleton and weights of the puppet. Next, click on the Clipping Masks button at the bottom of the Optional puppet warp settings.
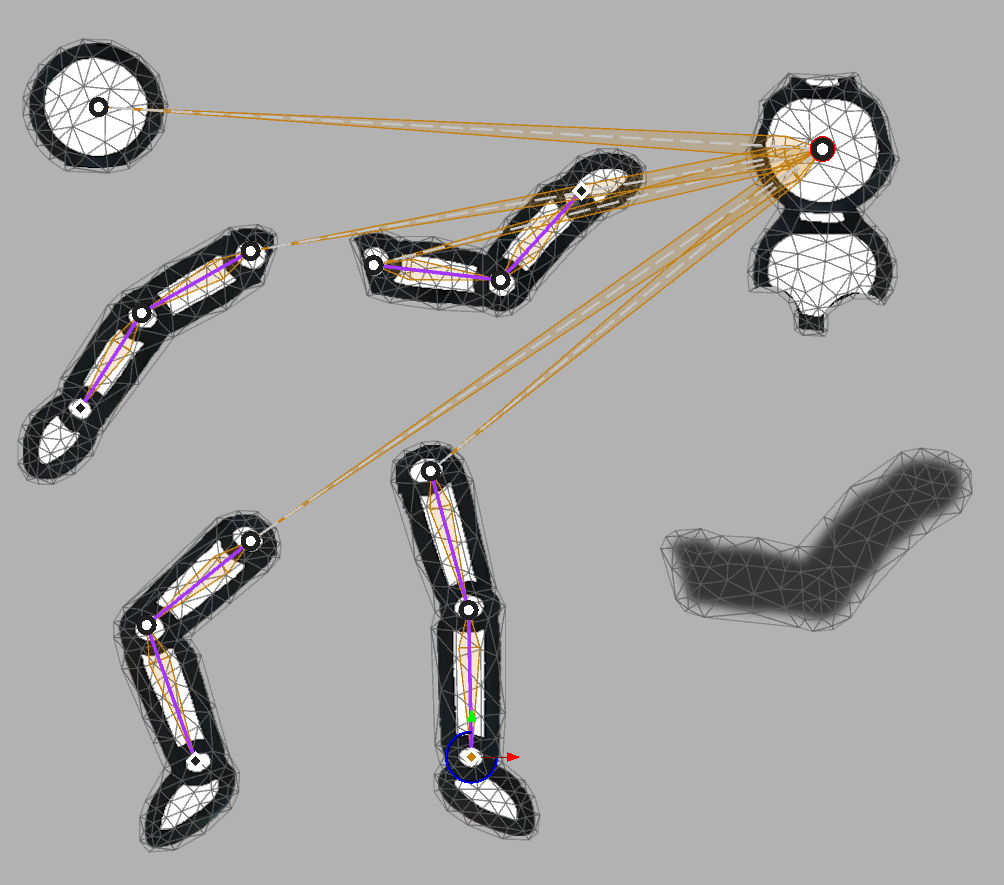
You will find all limbs in the list on the right-hand side. Select the limb which represents the part of the puppet that you want to be hidden by default. In our showcase example, we want the purple ball to only be visible when it moves over the red rectangle. We select the limb representing the purple ball and click on Assign Clipping Mask. Follow the pop-up that appears and create a new clipping mask.
Next, paint over the limb that you want the hidden limb to become visible over. There is no need for precision, Wallpaper Engine will only draw the hidden element when the limbs actually touch each other. Once your mask is done, confirm with OK. The limb will now become invisible. See the following video to see these steps up until now:
You can also create nested clipping masks for very complex scenarios. In this case, one limb would only become visible over another limb and a third limb would only become visible when moved over both of the other limbs at the same time.
Invalid Clipping Masks
Wallpaper Engine will display an warning message if you create invalid clipping masks. For example, you cannot create a clipping mask from one limb to another and then back from the second limb to the first limb.
# Using a Clipping Mask in Animations
Once you create a clipping mask, the affected limb will immediately become invisible in the editor. However, this is to be expected and limbs can still be used in animations. Take a look at the following example where we move our previously hidden limb over the designated clipping mask:
The clipped limb becomes immediately visible when touching the other object, however, it remains invisible when it hovers over the other limbs which we did not include in the clipping mask. This is the basic principle behind clipping masks.
# Shadows & Shading with Clipping Masks
While the previous example was a bit abstract, this section will showcase how to utilize clipping masks to create shading and shadows on your puppet warp objects.
Before you get started, this example mostly makes sense on characters and objects which do not have any significant shadows drawn into the image. Ideally, your image features no shading at all and you utilize clipping masks to add this effect yourself, though it's not strictly necessary.
# Preparing the Character Sheet
Before we can start with the animation itself, we have to prepare a character sheet which features the shadows we want to cast. In our example, we first duplicate the arm of our dummy model with the image editor of our choice and then reduce it to a black shape. Next, we add a slight gaussian blur to the shadow limb to make it appear softer (like a real shadow would be). However, depending on the art style of your image, a blur might not be necessary. We also reduce the opacity of the shadow arm to around 20% - 30% since the shadow itself should not appear like a solid black object. Repeat this process for all individual shadows that you want to animate in your wallpaper.
# Puppet Warp Setup
Import the character sheet with your shadow limbs and create a new puppet warp animation. Just like in the Basic Principle of Clipping Masks section above, lock the geometry and create the puppet skeleton. When setting up the bone structure of your skeleton, ignore the shadow and do not assign any bones to it.
Any shadow limbs do not have any bones themselves. Instead, we move on to the Weights configuration for our puppet. The goal is to mimic the original weight layout on the shadow limb to match the original limb. In our case, we select the three bones of our arm and paint the shadow in exactly the same color layout as the original limb. Also make sure to use the Smooth All Weights functionality while selecting all vertices of the shadow limb to further smoothen the shadow:
In the next step, we go back to the Geometry settings of our puppet. We first lock the geometry (if you have not done so already). We then continue with the deformation editing tool by clicking on Edit Deformation. First, double-click on your shadow element to select it in its entirety. Then, place the shadow slightly below the original limb by dragging and dropping it there.
In the next step, we want to move the shadow on the z-axis, behind the limb. To do this, hold the ALT key to change the perspective of your camera until all vertices (rectangular dots) turn blue. Once the vertices are shown in a blue color, you can drag them along the z-axis towards the back of your limb. You can now fine-tune the position of the shadow, there is no "right or wrong" position, it is largely subjective and can also be adjusted at a later time.
Now that the shadow is in place, we need to ensure one more thing before we can continue. The depth order of your limbs must be sorted in a sensible way. This mainly means that the limb which casts a shadow onto another one must be in front of it. This can be quickly adjusted back in the puppet warp weight settings. First, enable the Show depth order option at the top of the weights menu, then select the first bone of your limb and use the Move Limb to Front option until it is in front of all limbs it is supposed to cast a shadow on. Green limbs are marked in front, red limbs are behind the object.
# Drawing the Clipping Mask
Next, select the Clipping Masks menu in the optional section of the puppet warp configuration. From there, click on the shadow and select Assign Clipping Mask. Now draw a clipping mask over all elements that you want the shadow to appear on. In our example, we chose the upper body and the head of our dummy character. Confirm the clipping mask, the shadow should now turn invisible as long as it is not moved over any elements which are inside your clipping mask.
# Puppet Warp Shadow Animation
For any animations you create, the shadow will automatically mimic the motion of the limb that you have copied the weight colors from. You can always go back to the deformation editor in the Geometry settings of your puppet and readjust the position of your shadow relative to the limb that it represents.