# Interactive Puppet Warps
Puppet Warping in combination with SceneScript can also be used to create interactive wallpaper elements. In this tutorial, we will discuss how to allow users to grab and drag around individual bones.
You should have read and understood the Puppet Warp Introduction Guide before attempting this tutorial.
# Interactive bones
In this guide, we will go into how to create an interactive wallpaper element that users can drag and release.
If you would like to follow along or see the full sample project, you can download it here:
# Setting up the puppet warp.
In order to achieve this, we need to utilize puppet warping in combination with SceneScript. We start by creating a puppet warp on our jelly object. The geometry does not require any special attention. For the bone setup, our basic example only includes two bones: One static root bone which represents the outer areas of our jelly object and another bone in the center of the jelly object that has been configured to use Spring simulation in the Bone Constraints:

For the bone constraints of the center bone, we have enabled Spring simulation and then Physics translation and left everything else in its default state. This means that we are able to move the bone around (this is what enabling physics translation does) and since it's a spring simulation, it will automatically return to its original position when the mouse cursor is released.
Also, it's important to set a Name for the bone that we can later reference in our code. In our example, we will set the name MouseBone to the bone when selecting it in the editor.
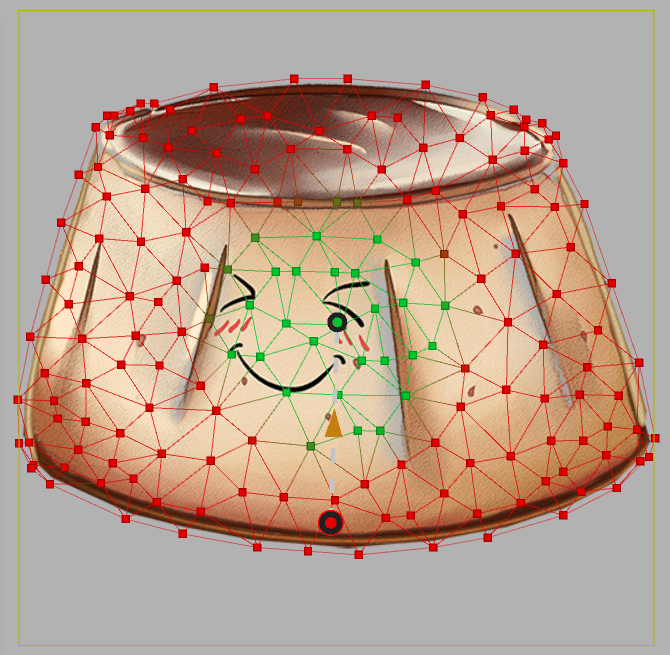
For the bone weights, the center bone gets a small area in the middle of the object. In our case, the green area represents the area that will be dragged by the mouse cursor, while the red area represents the immovable area that belongs to the root bone:
We do not need to create any animations for this example, as the mouse interactions are completely separate from this.
# SceneScript code for the mouse drag
Next up, we need to assign a SceneScript code snippet to the jelly image layer. Select the layer and click on the cogwheel icon in the upper right corner, next to the visibility and lock icon. You can copy-paste the code from below and inspect the code comments for some additional details:
'use strict';
// Set the maximum distance that the bone can be dragged away
const DRAG_MAX_DISTANCE = 100;
// Set the "Name" of the bone that can be dragged as defined in puppet warp setup
const MOUSE_BONE_NAME = 'MouseBone';
var activeDragBone;
var isDragging = false;
var dragDelta;
var dragStart;
/**
 * @param {Boolean} value - for property 'visible'
 * @return {Boolean} - update current property value
 */
export function update(value) {
	if (isDragging) {
		// Use the mouse cursor position to calculate the drag distance
		var drag = input.cursorWorldPosition.subtract(dragStart);
		var dragDist = drag.length();
		drag = drag.divide(dragDist);
		// Limit the distance to the max distance that was configured in the DRAG_MAX_DISTANCE constant at the top
		drag = dragStart.add(drag.multiply(Math.min(DRAG_MAX_DISTANCE, dragDist)));
		// Move the bone to the newly calculated drag distance
		thisLayer.setBoneTransform(activeDragBone, thisLayer.getBoneTransform(activeDragBone).translation(drag.add(dragDelta)));
	}
}
/**
 * @param {CursorEvent} event
 */
export function cursorDown(event) {
	var bonePos = thisLayer.getBoneTransform(1).translation();
	var delta = bonePos.copy().subtract(input.cursorWorldPosition);
	var len = delta.length();
	// Update the drag position if it's not further away than the maximum distance
	if (len < DRAG_MAX_DISTANCE) {
		dragStart = bonePos;
		dragDelta = delta;
		isDragging = true;
	}
}
/**
 * @param {CursorEvent} event
 */
export function cursorUp(event) {
	// Release the drag animation in the next update() call
	isDragging = false;
}
/**
 * Get bone for mouse movement
 */
export function init() {
	// Get the numeric index of the bone that can be dragged and store it for later use
	activeDragBone = thisLayer.getBoneIndex(MOUSE_BONE_NAME);
}
First, the code loads the bone that can be dragged by its name and stores it in a variable. You can change value of MOUSE_BONE_NAME at the top of the code if you have given your bone a different name during the puppet warp setup:
thisLayer.getBoneIndex(MOUSE_BONE_NAME);
The main movement of the bone occurs in the update() function. The bone is constantly moved towards mouse cursor position, specifically this line in the code handles all of the movement:
thisLayer.setBoneTransform(activeDragBone, thisLayer.getBoneTransform(activeDragBone).translation(drag.add(dragDelta)));
By using thisLayer.setBoneTransform, we can alter any bone on the current layer by accessing it through its index. The second parameter thisLayer.getBoneTransform(activeDragBone).translation(drag.add(dragDelta)) may look a bit confusing at first glance, but it's really not that complex. Basically, it just means we take the position of the bone and then move it according to the mouse cursor position on the wallpaper with the .translation() function.
When the mouse cursor is released, the bone will return to its original position, since the bone has been configured to use Spring simulation in the puppet warp. This means the bone will return to its original position automatically and without the need for extra code.
TIP
You can use SceneScript to override all puppet warp animations reliably. Wallpaper Engine will execute all animations on all layers before it will execute any scripts on a frame before displaying a layer.
Once you have applied this code snippet to the jelly layer, you can click on Run Preview at the top or apply the wallpaper and it should already be functional like in the preview video above. Keep in mind that this will only work for one
# Advanced interactions puppet warp
We have also created a much more complex example of this in a separate project. In this case, the jelly has a large number of bones which can all be dragged around. Additionally, it includes a timeline animation which is triggered by SceneScript whenever the mouse is released to simulate the physical impact of the bone returning to its original state (see the impact jiggling in the video below). The jelly texture has also been made into a sprite sheet with multiple facial expressions which are switched around when the dragging animation starts. The example also includes sounds and is overall a little more complex, but if you would like to see how we achieved this, you can check out the sample project at the following link:
You can see the advanced example in action in the following video: