# Bone Physics Simulation
Wallpaper Engine also allows you to configure certain physics simulations for the puppet warp bones. When selecting a bone, you click on Bone Constraints to configure these properties of your bones. In this guide, we will explain what each individual option does and show you an exemplary use-case.
Scroll down to the bottom of this page to see a detailed explanation of all bone constraint options.
WARNING
Keep in mind that the physics simulations can slightly change their behavior depending on the max FPS settings of your users. The Wallpaper Engine editor will always render at a high frame rate. You can apply your wallpaper to the desktop and set a low FPS limit of 10-15 in the Wallpaper Engine settings to see how the wallpaper performs under stricter FPS rules.
# Bone Physics Examples
We will use the Samurai example from the Puppet Warp Character Sheet Guide to showcase two different types of implementations of bone physics. If you would like to check out the examples from this guide in detail, click here to download the sample project.
# Simple Rope Physics
In our first example, we will add physics simulation to the rope attached to the sword of the samurai character that we have used in the other puppet warp guides:
To achieve this, we open up the Skeleton step of the puppet warp and select the bone which connects the samurai's hand and the root bone at the bottom of the rope:
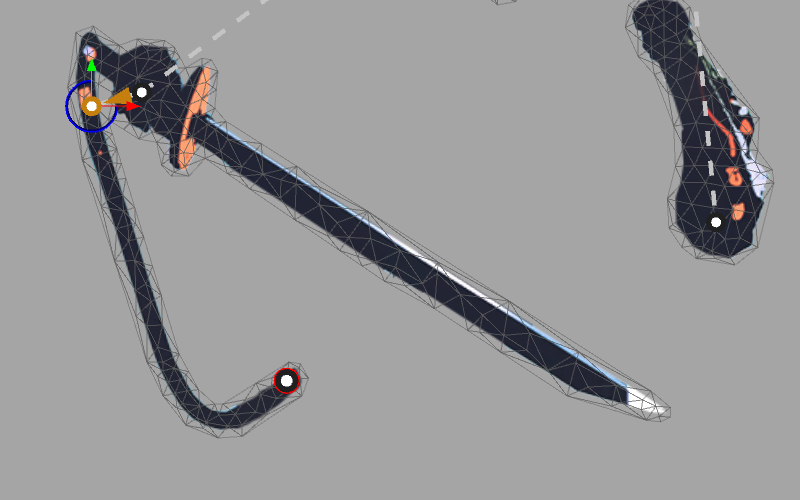
We then click on the Edit Constraints button on the right-hand side to open the Bone Constraints menu. In this case, we enable the Rigid simulation option and configure it as follows:
- Physics rotation: Enabled - We want the bone to be able to rotate as visible in the preview video above.
- Rotational friction: 12
- Rotational inertia: 20
- Physics translation: Disabled - We don't want the bone to move.
- Gravity enabled: Enabled - We want gravity to pull the rope downwards.
- Tip mass: 20
- Gravity direction: 90 - A value of 90 means the gravity is pulling downwards.
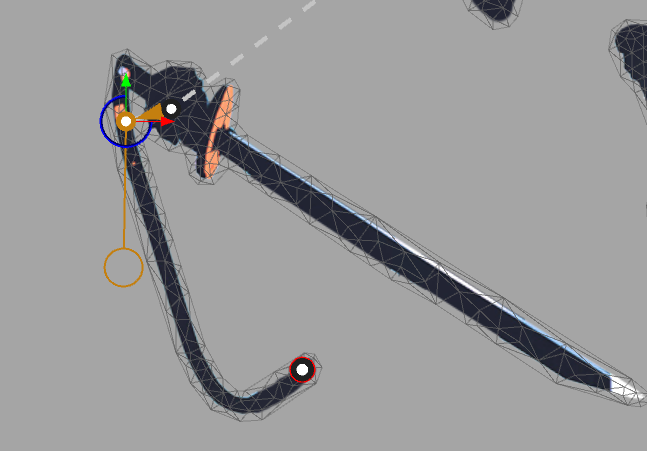
- Tip forward angle: 90 - The tip angle determines how gravity and movement affects the bone. After configuring this, check the brown guideline with the circle ending that comes off your bone after changing this value to verify the direction.
- Limit rotation: Enabled - Set it to -180 and +180 to ensure prevent any excessive rotations.
You will also notice that the forward angle becomes visible in the bone preview, visualized by the brown line with the circle at the end, make sure it points in the correct direction (in this case: the direction of gravity).
This is all that it takes to enable the physics for the rope bone. You do not actually need to animate the bone itself, but rather you should animate a parent bone (in this case the hand) and the bone will dynamically follow along and simulate the physics. You may need to tweak the values from above for your example, it's not possible to provide you with values that will work in all cases but you can use the values from above as a baseline and then tweak them to your specific use-case.
# Rope Physics with a kinematic chain
An alternative approach to rope physics was added with Wallpaper Engine 2.6. It allows you to use kinematics to achieve rope physics with ease. For this approach, a rope consists of multiple bones and you simply mark the last rope element as the rope - all previous rope bones will automatically be included in the simulation. This type of physics also offers advanced capabilities such as a wind and gravity simulation.
To get started, set up a model with a rope that you want to animate. In the following picture, you can see our sample setup where we have 4 rope bones and a final rope endpoint bone. To continue with the rope physics setup, select only the last bone of the rope and click on Edit Constraints. It is important to leave the other rope bones in their default state.
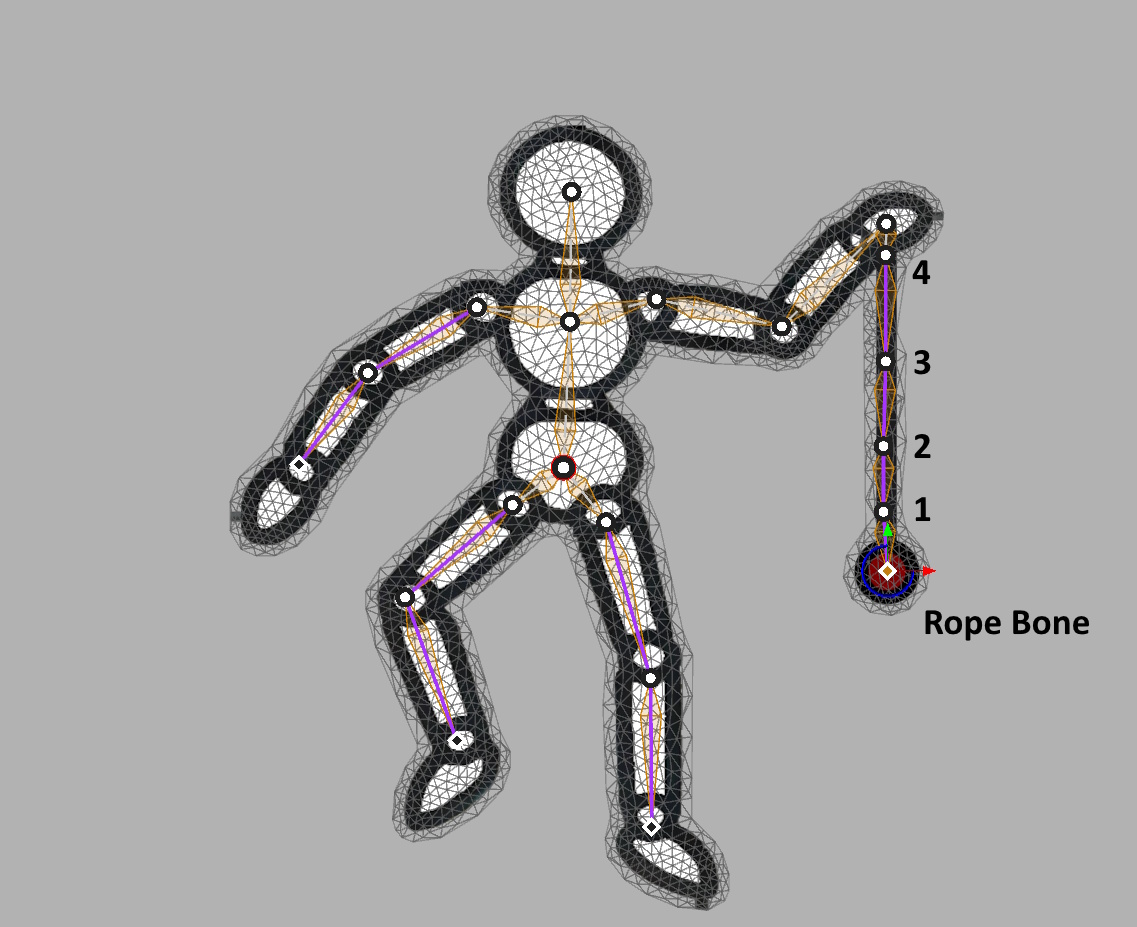
For a basic setup: Select the "Rope with 4 elements" option from the list offered in the Simple tab. Make sure your rope consists of exactly 4 bones plus your endpoint, as the rope physics will be applied to the previous 4 bones. There is nothing further you need to do, the physics animation will now already work. The rope will seamlessly integrate into the surrounding animation. This simple setup works if the endpoint is fixed and controlled by your animation.
If you are creating a rope that is attached on two ends, consider adding a Blend Rule to the last rope bone to attach it to another bone. If you do not use a blend rule in this type of setup, you need to manually animate the endpoint position of your rope. After creating the blend rule, do not forget to raise it to a value of 1.0 in your animation as explained in the Blend Rule tutorial.
For a more customized setup: Since we want a loose endpoint for our example, we switch over to the Advanced tab. Set the Simulation mode to Kinematic Chain. You can also define the number of rope elements. By default, just like in the previous basic setup, this is set to 4 bones. However, if your rope is significantly longer or shorter, you can tweak this number to fit the number of bones that you assigned to the rope. Next, make sure the the Behavior option is set to Rope simulation.
By default, the rope endpoint itself is fixed, meaning it will not move as part of the physics simulation. In our the example, we want to make the rope endpoint a loose object that is dangling off of a rope. To do this, we disable the "Stretch enabled" option and instead enable the Free endpoint option.
Here is an overview of all options you can choose to tweak to fit your setup:
- Gravity enabled: Enables a downwards force on your rope element. Can be configured in the overall wallpaper settings.
- Stretch enabled: Allows for the rope to act like a rubber band when moved away from the endpoint. Can only be used when Free endpoint is set to disabled.
- Free endpoint: When enabled, the last rope element is dangling around freely instead of being fixed as part of your animation.
- Mass: The mass of the endpoint, higher mass causes slower acceleration.
- Friction: Higher values of friction cause the object to slow down faster.
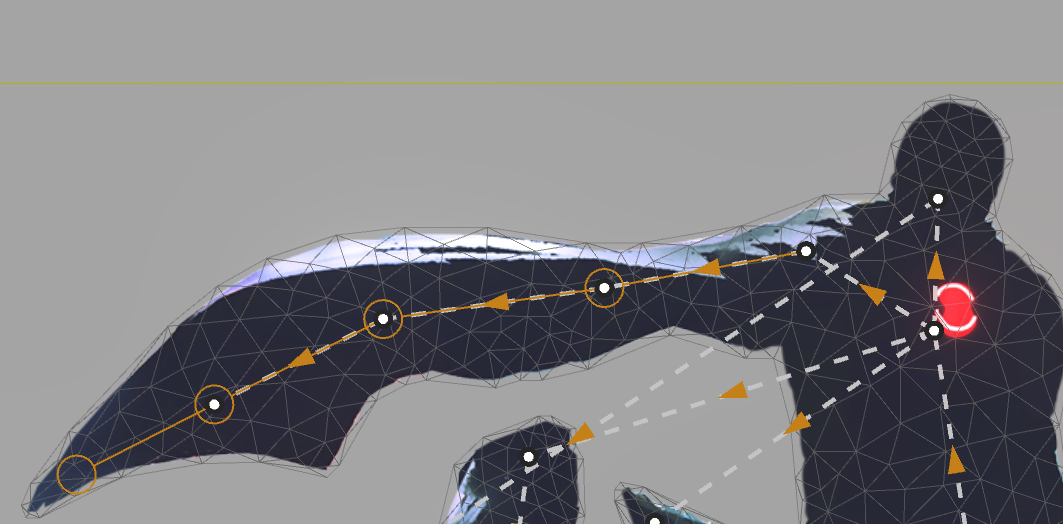
After the setup, notice the purple highlighting between your rope bones and the last configured rope endpoint bone. From here on out, you can continue with your animation as you normally would.
# Optional: Rope Physics Wind
Additionally, rope physics in a kinematic chain also support a wind simulation which can be enabled in the general wallpaper settings on the left-hand side. You are able to configure the wind direction, the wind depth (back-and-forth movement on the z-axis) and the wind speed.
Do note that wind physics only become enabled once a puppet warp animation has been created and enabled for your model. Only if you have not configured any other animation for your puppet yet: For testing purposes, we you can create an empty animation and name it Wind Test and assign it as an active animation for our puppet warp. After testing the wind settings, you should delete this animation again. If you want to only have a wind animation of an otherwise static object, you can leave this empty animation in place.
# Cape / Cloth Physics
Next up, we will animate a series of bones with a physics simulation. We will use the cape of the samurai as an example, as it spans across multiple bones which are all exclusively moving the cloth of the cape:
Specifically, we are dealing with the four bones which are present along the cape, as shown in the following screenshot where they have already been fully configured:
The first three bones on the cape have been configured to use a Spring simulation, while the last bone on the left has been configured to use a Rigid simulation. This is not necessarily the best solution, but we felt that the outcome of this looked quite nice in this case and you can experiment with mixing bones with rigid and spring simulations and see how the behavior changes.
TIP
Keep in mind that chaining multiple spring simulated bones will transfer their bouncy movement and can lead to erratic motions more easily.
# Configuring the bones
All bones have been kept at their default settings for the most part. We have enabled Limit rotation and configured it to -20 for the minimum value and +20 for the maximum value to ensure the cape movements are not too excessive. The second bone of the cape (on the right) also has Gravity enabled at its default settings to simulate a downwards force. Gravity has been left disabled for the other elements as it looks better if all the motion comes from the animations of the samurai. You could experiment around with this further and set the Gravity direction to 180 (meaning to the left) as you may be able to simulate a strong sidewards wind with that, for example.
# Configuring the forward angles
In the example above, you can see that all the bones on the cape have a forward angle, represented by the brown lines with the circle at the end. It's important that the forward angle points towards the next bone, you can see that the brown circles are always around the next bone.
However, there is one important exception and that's the very last bone on the cape. You can see that the brown circle ends towards the tip of the cape. This must be manually configured by changing the Tip forward angle value until the forward angle points in the correct direction. Due to how the forward angle works, this may be a bit tricky to set up. Just be sure to check that the last brown circle points towards the outside tip of your character or object. The value entered is essentially an offset to the default direction that Wallpaper Engine infers.
# Animating the cape
Unlike the rope example, we also add slight movement animations to all the physics simulated cape bones and don't fully rely on pure physics for the cape. The motion from the cape animation and the physics simulation will be merged, this allows us to create a more realistic cape without having to create very precise animations, since we simply rely on the dynamic simulations to add any realistic details to the cape.
# Bone Constraints
When you select a bone in your puppet warp skeleton, you can click on Bone Constraints to see advanced options for a particular bone.
You have two main options that you can decide between at first:
- Spring simulation: Enables bouncy simulation of the bone. The bone will act like a spring and always try to return to its default position.
- Rigid simulation: Enables drag simulation of the bone. The bone will act as a body that can be dragged around and it will keep its last position.
You can use a combination of these, for example, the first bone of a physics-simulated object may use the spring simulation while the rest may use the rigid simulation. We suggest you simply play around with these settings until you get a feeling for how they influence the simulation, since it may be difficult to judge beforehand which exact values you need to get the result you're looking for.
# Bone Constraint Options
- Physics rotation: Enables dynamic simulation for the rotation of the bone. This is useful for most cases.
- Rotational stiffness (spring only): How strongly the bone will attempt to return to its default rotation, think of the stiffness of a spring. Increasing this will make the spring stronger and less bouncy, decreasing this will make the spring loose and less reactive.
- Rotational friction: How much rotational movement is reduced with every frame. You can increase this to reduce jittery movement.
- Rotational inertia: This reduces how much of an effect animation movement has on the bone. Increasing this will make the bone less reactive to fast animations.
- Physics translation: Enables dynamic simulation for the position of the bone. This is useful if distortion of the object is the goal of the animation or if the object is separated into different spaces.
- Translational stiffness (spring only): How strongly the bone will attempt to return to its default position, think of the stiffness of a spring. Increasing this will make the spring stronger and less bouncy, decreasing this will make the spring loose and less reactive.
- Translational friction: How much translational movement is reduced with every frame. You can increase this to reduce jittery movement.
- Translational inertia: This reduces how much of an effect animation movement has on the bone. Increasing this will make the bone less reactive to fast animations.
- Max distance (translation only): This limits the maximum distance the bone is allowed to move.
- Gravity enabled: Enabling this will make the bone react to gravity. It will attempt to move towards the direction of gravity as if it was suspended in air.
- Tip mass: A higher mass will make the bone react more strongly to gravity instead of movement from the animation.
- Gravity direction: This is the direction of gravity.
- Tip size: This lets you override the distance between the simulated weight of the bone and the center of the bone. A greater size will make the bone less reactive to certain animations, while a smaller size will make it more reactive. If you leave it at 0 and the bone has exactly one child bone, the size is dynamically set to match the distance to the child. Setting this value to anything other than 0 will override the size. You can see the size in the editor by looking at how far the orange circle is from the bone you just edited.
- Tip forward angle: This lets you override the angle of the tip. By default the tip will face the direction towards the child bone, if there is one, otherwise it will face the default forward direction of the bone, along the X axis. You can change this direction in either case with this option. This option applies an offset to the current direction.
- Limit rotation: Using this option allows you to limit the maximum rotation of the bone in either direction. This can be useful to steer the bone into the desired direction and prevent it from rotating 180 degrees.
- Min angle: The minimal angle of the allowed rotation. By default this is -180 degrees.
- Max angle: The maximum angle of the allowed rotation. By default this is 180 degrees.
- Limit torque: Enabling this option allows you to limit the maximum rotational force applied to the bone. You can use this option to prevent the bone from spinning erratically due to very fast animations.
- Max torque: The maximum allowed force, any forces greater than this will be limited to the maximum value.